Measuring a roof for metal roofing sounds deceptively straightforward. You climb up with a tape measure, record some lengths and widths, multiply the numbers together, and call it a day. In reality, professional metal roof measurement is a precise technical process that goes far beyond surface dimensions, and errors in that process translate directly into wasted material, structural misalignment, failed solar racking, and costly re-orders that can derail an entire project.
For homeowners and contractors on Long Island, the stakes are particularly high. The region’s coastal exposure demands that metal roofing systems be installed with engineering precision. Panels that do not align properly with structural framing create stress concentrations that fail under wind uplift; material orders that underestimate waste factors leave projects stalled mid-installation; and roofs that are not measured with solar integration in mind require expensive rework when photovoltaic systems are added later. Many homeowners ask, “Can I install solar panels on my roof?” and the answer starts with an accurate measurement.
This complete guide walks through every dimension of professional metal roof measurement: the geometry of roof planes and slope, the math of squares and material estimates, how hips and valleys change the calculation entirely, the technical specifications that tie measurement to structural performance.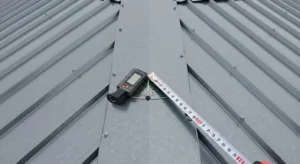
Professional Roof Geometry Beyond the Tape Measure
The foundation of any accurate metal roof measurement is a thorough understanding of roof geometry. A roof is not a flat surface, it is a three-dimensional assembly of intersecting planes, each with its own slope, length, and relationship to adjacent planes. Before choosing the best roofing material for your home, a professional surveyor or roofing estimator must first fully characterize the roof’s geometric profile.
Roof Pitch and the Slope Factor
Roof pitch expressed as the ratio of vertical rise to horizontal run, such as 4:12 or 8:12 is the single most important geometric variable in metal roof measurement. Pitch determines the slope factor, a multiplier that converts the roof’s horizontal footprint (what you can measure from the ground or a satellite image) into the actual sloped surface area that panels must cover.
The slope factor for common residential pitches is as follows:
- 3:12 pitch: slope factor of 1.031 (nearly flat; sloped area is 3.1% greater than footprint)
- 4:12 pitch: slope factor of 1.054 (moderate residential pitch; sloped area is 5.4% greater)
- 6:12 pitch: slope factor of 1.118 (common steep residential pitch; 11.8% greater than footprint)
- 8:12 pitch: slope factor of 1.202 (steep pitch; sloped area is 20.2% greater than footprint)
- 12:12 pitch: slope factor of 1.414 (45-degree roof; sloped area is 41.4% greater than footprint)
Using the wrong pitch value or omitting the slope factor entirely are among the most common errors in amateur roof measurements. A homeowner measuring a 2,000-square-foot footprint on a 6:12 roof and ordering panels for 2,000 square feet will be short, approximately 236 square feet enough to leave several roof planes uncovered.
Eave-to-Ridge Run and True Rafter Length
The eave-to-ridge measurement, the true sloped distance from the bottom edge of the roof to the ridge at the peak, is the panel length measurement for a standard gable roof plane. This is not the horizontal distance from eave to ridge; it is the hypotenuse of the right triangle formed by the rise and the run. For a roof with a 20-foot horizontal run and a 6:12 pitch, the true rafter length is the square root of (20 squared plus 10 squared), which equals approximately 22.4 feet. Ordering 20-foot panels for this roof will leave a 2.4-foot gap at the ridge.
Why Long Island Homes Require Precision Calculations
Long Island presents a combination of architectural and environmental factors that elevate metal roof measurement from a general carpentry task to a precision engineering exercise. Understanding why these factors matter helps explain why professional measurement services, not tape measures and back-of-envelope math are the standard for serious metal roofing projects in Nassau and Suffolk counties.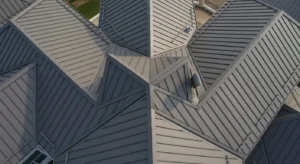
Architectural Complexity of Long Island Housing Stock
Long Island’s housing stock spans more than a century of architectural styles, from the simple gable-roof Cape Cods and ranch houses of the post-war suburbs to the complex hip-and-valley rooflines of contemporary colonial and Victorian-style homes. Many properties also have additions, dormers, eyebrow windows, and skylights that interrupt the primary roof plane, creating additional measurement complexity. Each intersection, penetration, and change in plane direction must be individually measured and accounted for in a material takeoff. This complexity is why a roof inspection service is vital before any major project.
Coastal Wind Load Requirements Drive Structural Precision
Metal roofing panels on Long Island must be attached to structural framing rafters or purlins at fastener intervals calculated to resist design wind uplift forces of 130 to 150 mph. This means every panel must be precisely positioned so its fastener rows align with the structural framing below. A measurement error that misaligns panels with rafter locations forces the installer to either add supplemental blocking an expensive, labor-intensive fix or fasten into decking alone, which provides inadequate pull-out resistance in a high-wind event.
Thermal Expansion Tolerance Planning
Metal roofing panels expand and contract significantly with temperature changes. On Long Island, where temperatures swing from below zero in January to over 95 degrees Fahrenheit in July, a 20-foot steel panel will expand and contract by approximately 3/16 of an inch over that temperature range. Professional measurement must account for this thermal movement in the placement of fixed versus floating clip locations and in the design of expansion joints at panel end-laps details that only emerge from precise dimensional knowledge of the installation. For a deeper look at how climate affects efficiency, you can review Energy.gov’s guide on efficient roof design.
The Math of Roof Squares and Material Estimates
The roofing industry measures and sells roofing material by the square, where one square equals 100 square feet of roof surface area. Understanding how to convert your dimensional measurements into an accurate square count — and then how to convert that square count into a precise panel order — is the core mathematical skill of metal roof estimation.
Step-by-Step Square Calculation
Step 1: Measure the horizontal footprint of each roof plane: Record the horizontal eave length (width) and horizontal run (depth from eave to ridge) for each plane on the roof.
Step 2: Apply the slope factor: Multiply the horizontal area of each plane by the slope factor for that plane’s pitch. Sum the adjusted areas across all planes to get your total sloped surface area.
Step 3: Convert to squares: Divide the total sloped surface area by 100 to get your square count.
Step 4: Add waste factor: A standard waste factor of 10 to 15 percent is applied to a simple gable roof. Hip roofs with multiple planes, complex valley intersections, and structures with dormers or penetrations typically require 15 to 20 percent waste allowance. Multiply your square count by 1.10 to 1.20, as appropriate.
Step 5: Convert squares to panel lengths and quantities: Divide the total adjusted surface area for each roof plane by the net coverage width of your chosen panel profile to determine the number of panel lengths required per plane. Metal roofing panels are manufactured in specific coverage widths typically 12 inches, 16 inches, or 24 inches for standing seam, and 24 to 36 inches for exposed-fastener corrugated or R-panel.
Step 6: Calculate trim and flashing quantities: Ridge cap, eave trim, rake trim, valley flashing, pipe boot flashings, and transition flashings are ordered in linear feet. Measure the total linear footage of each trim condition separately from your panel calculation.
Complex Profiles: Factoring in Hips, Valleys, and Waste
The gable roof is the easiest case. The moment a roof introduces hip ends, valleys between intersecting planes, dormers, or cross-gables, the measurement complexity multiplies, and so does the waste factor. This is where amateur estimating consistently falls short and where professional measurement pays for itself in material savings alone.
Hip Roofs
A hip roof has four sloping planes meeting at a ridge and four hip rafters running diagonally from the building corners to the ridge ends. Measuring a hip roof requires calculating the area of each trapezoidal and triangular plane separately. The two long trapezoidal sides are measured like a modified gable plane. The two triangular hip ends require measuring the base width at the eave and the slant height from the eave to the ridge. The hip itself creates diagonal panel cuts which generate significant material waste. Waste factors for a full hip roof typically run 15 to 20 percent.
Valleys
Valley intersections are among the most material-intensive features on any roof. Panels running into a valley must be cut at a compound angle combining both the valley’s plan angle and the roof pitch which creates a tapered cut from full width at the ridge to a narrow tip at the eave. Each such tapered cut eliminates a triangle of material from the panel’s coverage. Skipping this calculation results in orders that are consistently short—the most common location for mid-project material reorders on Long Island roofing jobs.
Dormers and Penetrations
Each dormer on a Long Island colonial or Cape Cod introduces at least two valley conditions plus a new gable or hip plane above the main roof surface. While the dormer area is often subtracted from the main plane’s square count, the additional cutting waste on panels adjacent to the dormer’s side walls and the linear footage of flashing required at the dormer base often add as much material cost as the area removed. Each penetration chimney, skylight, vent stack adds both a cutout in a panel and additional flashing linear footage that must be separately accounted for.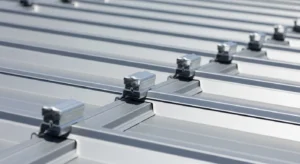
Technical Specifications: Rib Spacing and Structural Alignment
Measuring a roof for metal roofing goes beyond calculating surface area. The dimensional measurements of the roof must be cross-referenced with the technical specifications of the selected panel profile, specifically the rib spacing, the net and gross coverage width, and the structural framing layout beneath the deck.
Understanding Net vs. Gross Panel Width
Every metal roofing panel has a gross width the full physical width of the panel blank and a net coverage width, which is the actual amount of new roof surface the panel covers after accounting for the overlap at one or both edges. For a standard 24-inch coverage standing seam panel, the gross width is typically 25 to 26 inches. Using gross width instead of net coverage width in panel count calculations is a classic amateur error that produces an undersized order.
Rib Spacing and Rafter Alignment
For exposed-fastener metal roofing, screws are driven through the panel face at the major rib locations. For the screws to achieve rated pull-out strength, they must land in structural framing either a rafter or a purlin. The rafter spacing of the structure must therefore be measured and documented as part of the roof measurement process, and the panel layout must be coordinated so that panel ribs align with framing members at the correct fastener spacing intervals.
Panel Length Increments and Manufacturing Lead Times
Standing seam panels are typically roll-formed to custom lengths on a portable mill brought to the job site or factory-ordered in specific lengths. Custom lengths eliminate end-lap waste but require precise rafter-length measurements to the nearest quarter-inch. An error of even one inch in a 20-foot panel order compounds into a significant material misfit that must be corrected in the field often at substantial additional labor cost.
Engineering for Efficiency: The Link Between Metal and Solar Racking
For Long Island homeowners installing solar panels on a metal roof, the roof measurement process must extend beyond material takeoff to include solar racking coordination. A metal roof measured only for panels, without considering the solar layout, is an incomplete plan that may require costly rework at the time of solar installation.
Solar Array Layout and Panel Orientation
The solar array layout for a Long Island home is determined by available south-facing roof area, roof pitch, shading analysis, and the framing’s structural capacity to support the additional dead load of the panels. Each of these inputs depends on precise roof measurements. South-facing roof plane dimensions determine the maximum array size; pitch determines the optimal tilt angle; and rafter spacing determines where solar mounting feet can be safely anchored.
Clamp Spacing and Standing Seam Location
On a standing-seam metal roof, solar panels are mounted using non-penetrating seam clamps that grip the standing seam rather than puncturing the panel face. The spacing of standing seams determined by the panel’s net coverage width therefore directly determines where solar mounting clamps can be placed. A solar layout that does not align with the standing seam spacing will either require repositioning the array or using additional spanning rails, both of which affect the engineering and cost.
Coordinating Roof and Solar Measurements From Day One
The most efficient approach for Long Island homeowners is to commission a combined roof and solar measurement and layout drawing before the first panel is ordered. This integrated drawing maps the structural framing layout, the metal panel grid, the standing seam locations, and the proposed solar array footprint onto a single coordinated document. It ensures that every attachment point in both the roof and solar systems is supported by engineered structural backing. For those interested in safety myths, you might ask are metal roofs magnetic or do they attract lightning, but structural integrity is the true key to safety.
Conclusion
Measuring a roof for metal roofing is a multi-layered process that begins with geometry and ends with structural engineering. The homeowner who takes a tape measure to their eaves and calls the result a roof measurement has captured one data point of a much larger picture that also includes slope-corrected area, framing alignment, waste geometry, thermal movement tolerance, and solar integration coordinates.
For Long Island homeowners, the stakes of getting this measurement right are amplified by the region’s coastal wind exposure, code requirements, and the significant financial opportunity presented by combining a precision metal roof with a solar energy system. A measurement error is not just a material waste problem, it is a structural performance problem, an energy efficiency problem, and potentially a safety problem.
The right approach is to commission a professional precision quote from a licensed Long Island metal-solar roofing contractor who brings dimensional survey tools, structural engineering expertise, and solar design capability to your project from day one. When you choose a professional solar panel installation service, the result is not just an accurate material order, it is a complete engineered installation plan that protects your home, optimizes your energy performance, and delivers long-term value that a tape measure alone cannot.
Ready for a Precision Measurement?
Contact Solaroof NY today for a professional roof assessment and engineering-grade measurement.