The short answer is yes. Professional roofing contractors can successfully repair or replace roofs in winter, provided they adjust their installation methods for the cold. While the ideal temperature for asphalt shingles is above 40°F (4°C), experienced crews on Long Island can work in temperatures as low as 20°F by using hand-sealing techniques, keeping materials in warm storage, and adjusting pneumatic nail gun pressure to prevent shingle cracking.
Waiting until spring isn’t always an option. If you are dealing with active leaks or ice damming, a winter installation is necessary to prevent structural rot. At Solaroof NY, we adapt to the unique coastal winters of Nassau and Suffolk counties to ensure your warranty remains valid and your home stays dry.
The Science of Cold: What Changes on Your Roof?
Winter installation isn’t just about the installer being cold; it’s about the physics of the roofing materials. When the temperature drops, three critical things change:
- Shingle Brittleness: Modern fiberglass asphalt shingles lose flexibility in the cold. If a roofer tries to bend a cold shingle, it can snap or develop micro-fractures that compromise the lifespan of the roof.
- Sealant Dormancy: The factory-applied thermal sealant strip (the “tar line”) requires solar heat to activate and bond the shingles together. In winter, this natural bonding doesn’t happen immediately, making the roof vulnerable to wind uplift unless specialized hand-sealing is performed.
- Tool Calibration: Cold air is denser, and air compressors can freeze. This changes the output of pneumatic nail guns. If the pressure (PSI) isn’t adjusted correctly, nails can be over-driven (tearing the shingle) or under-driven (leaving heads exposed), compromising the roof’s integrity.
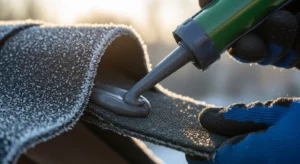
The 40-Degree Rule & Material Handling Protocols
Manufacturers like GAF and Owens Corning publish cold weather instructions for a reason. The industry “sweet spot” is 40°F and rising. Below this, we implement strict protocols to ensure the roof performs as guaranteed.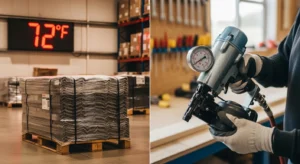
| Feature | Standard Install (>45°F) | Winter Adaptation (<40°F) |
|---|---|---|
| Storage | Bundles stored on-site/rooftop. | Kept in warm storage (70°F+) prior to use. |
| Sealing | Sun activates factory thermal strip. | Manual hand-sealing of tabs required. |
| Cutting | Standard utility knife scoring. | Careful handling to prevent fractures. |
| Nailing | Standard PSI settings. | Adjusted PSI to prevent blow-throughs. |
Specific Challenges for Nassau and Suffolk Counties
Roofing in our area involves specific coastal variables. High humidity combined with freezing temps can create a slick layer of frost on roof decks invisible to the naked eye. We wait for the mid-morning sun to burn this off before stepping on the roof. Because Nor’easters bring high winds, our crews use specific 6-nail patterns (hurricane nailing) combined with hand-sealing to ensure your metal roofing or shingle system stays tight during the curing period.
Ice Dams: The Silent Winter Roof Killer
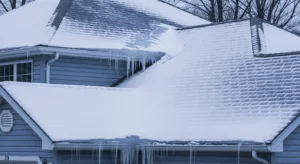
Long Island winters are notorious for the freeze-thaw cycle. Ice dams form when heat escapes through your attic, melting the snow on the upper parts of your roof. That water then runs down and refreezes at the cold eaves, creating a literal dam of ice. If you notice large icicles hanging from your gutters, waiting until spring is a gamble you shouldn’t take.
A winter roof replacement allows us to install high-performance Ice & Water Shield membranes—a specialized waterproof underlayment that reaches far past the interior wall line to stop leaks even when ice builds up. Replacing your roof in the cold is often the only way to break the cycle and protect your home’s structural integrity.
The Economics of Winter Roofing: Is it Cheaper?
While roofing material costs stay consistent year-round, winter often provides more flexible scheduling. Because the “busy season” peaks in the fall, you may find that local crews can start your project within days rather than weeks.
However, keep in mind that winter labor is more intensive. Because we have to hand-seal every shingle and carefully manage temperature-sensitive materials, the labor time is slightly longer. The real “saving” comes from prevention—fixing a flashing leak in January is significantly cheaper than replacing moldy insulation and water-damaged drywall in May.
Homeowner Checklist: Ensuring a Safe Install
- Confirm Manufacturer Compliance: Ask if the installer follows cold weather instructions (hand sealing locations, specific adhesive types) to preserve your warranty.
- Warm Storage Plan: Bundles and adhesives should be kept above 70°F for 24 hours prior to installation to maintain flexibility.
- Same-Day Dry In: Ensure the crew plans to seal the roof deck with synthetic underlayment and Ice & Water Shield by the end of each work window.
- Safety First: Confirm ladders and walking surfaces are cleared of frost and ice before the crew begins.
Why a Leak Should Not Wait Until Spring
A brown ceiling stain is a warning sign that water has already found a path. Fixing the source in winter saves the drywall and stops hidden damage from spreading. Water moves in quiet ways; a tiny split at a chimney counter-flashing can drip during every winter storm, fueling mold growth in your insulation.
Don’t Wait for Spring Thaw
Fix your winter leaks now before they cause structural damage. Schedule your comprehensive evaluation today!
Conclusion
Winter is not the enemy of sound roofing—poor planning is. When crews warm materials, manage thermal shock, and hand-seal every tab, they deliver work that lasts. If you live on Long Island and need a team that understands the difference between a summer install and a winter adaptation, Solaroof NY is ready. Reach out today for a fast leak check or a quote for a winter-ready replacement.